MEET FEATURE REQUIREMENTS, SCHEDULE, and BUDGET! Consulting available to teach your organization to apply this methodology and tools for powerful quantitative management of your business processes.
Instruction of your staff at your site, using courseware, application example, and a functional Framework.
Mentoring your key staff on an ongoing or periodic basis, on these tools or on Quantitative Program Management.
Contracting or Employment in your organization on specific topics.
Subscribe on YouTube, and click the "Notification" Bell icon to be notified as content is published.
PowerOpI PowerQueryTool
The files provided include a small demo project, illustrating table structures for project material allocation, product structure BOM, project dates, and product element data. The Framework methodology isn't tied to any particular project; it's a framework for simplifying and building tables that can be JOINed to represent many expansions and views of an overall effort.
My own efforts have applied this to managing projects for electronic hardware and software, including semiconductor design: semiconductor wafer design, fab, verification and Qual; telecommunications and audio/video compression and streaming hardware and software design, qual and productization; and enterprise class storage hardware and software development, prototyping, system development, and qual. The Framework has evolved in ways to handle these project sizes and complexities; and handled each without encountering limits to size or complexity.
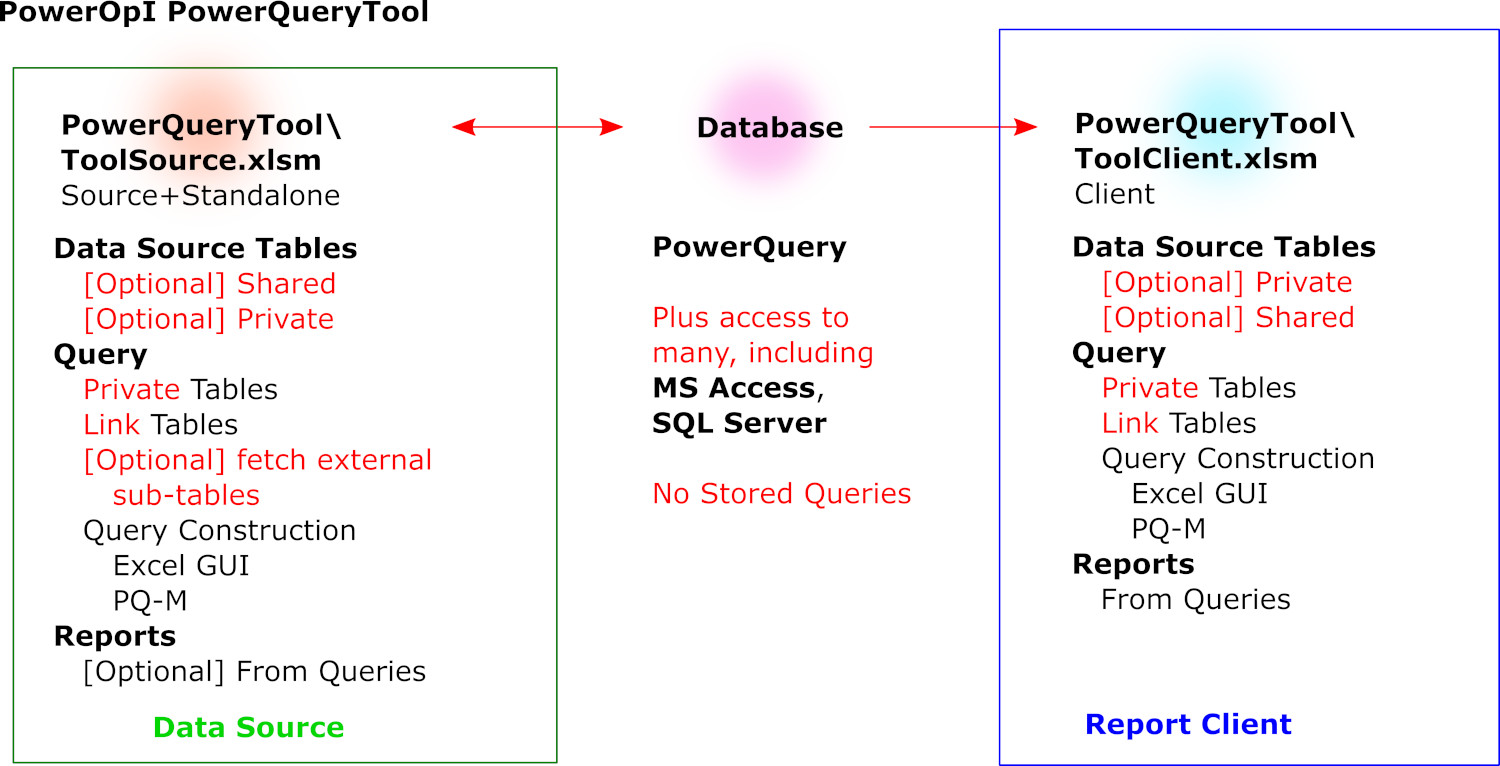
For reference in descriptions below, Framework elements can be used for several configurations. These can be illustrated as Standalone, Data Source, and Client configurations. Standalone contains Data Source, QUERY, and Report elements. These can be split many ways to provide Data Source and Client instances, to support distributed use with centralized maintenance and security; particularly with SQL Server and MS Access.
A distribution is created for each environment supported - PowerQuery; SQL Server; and MS Access. Organizations may have existing database environments set up for other co-existing use so you can focus on what's already available. Each PowerOpI Tool distribution supports configurations and capabilities appropriate to its database environment. PowerQueryTool supports QUERYs of Excel using M. SQLServerTool supports QUERYs of SQL Server via Excel Data Connections using SQL, and via PowerQuery using M, and M with embedded SQL. MSAccessTool also supports QUERY of MS Access via Excel Data Connections using SQL, and PowerQuery using M, and M with embedded SQL. There's a Framework distribution available via consulting agreement that aggregates all three environments; it functions properly, and provides a reference across environments.
Each PowerOpI Tool distribution includes a Demo Program implementing solutions to a common set of problems: Program Management logistics - planning and actuals for program schedule; allocation of build and bought material to organization and use; explosion of allocated material to buildable elements as the program progresses; connection of material elements to program dates; and connection of program elements to acquisition/build, receipt and distribution; and connection of elements and dates to financial planning, execution and actuals. The tools and methodologies are quite general, and can be used for a broader set of problems than illustrated by the Demo.
Differences among the environments are detailed in this Database Comparison. Differences are in consequences of distribution of clients, and in implementation skills. A quick summary:
PowerQuery is native to Excel, requiring no setup. It has amazing connectivity, supporting dozens of databases and file formats. You would use M which is powerful, but on the downside is not broadly known and is not well documented. PowerQuery doesn't support stored procedures, so each Client distributed contains full QUERYs that disclose QUERY structure and database structure to all Client users. So security and sustaining are more complicated. Given these, it seems to me best suited to decision support and data mining by individuals or a small group. It's not all one-sided - you can use SQL with M to get wonderful transformation capabilities.
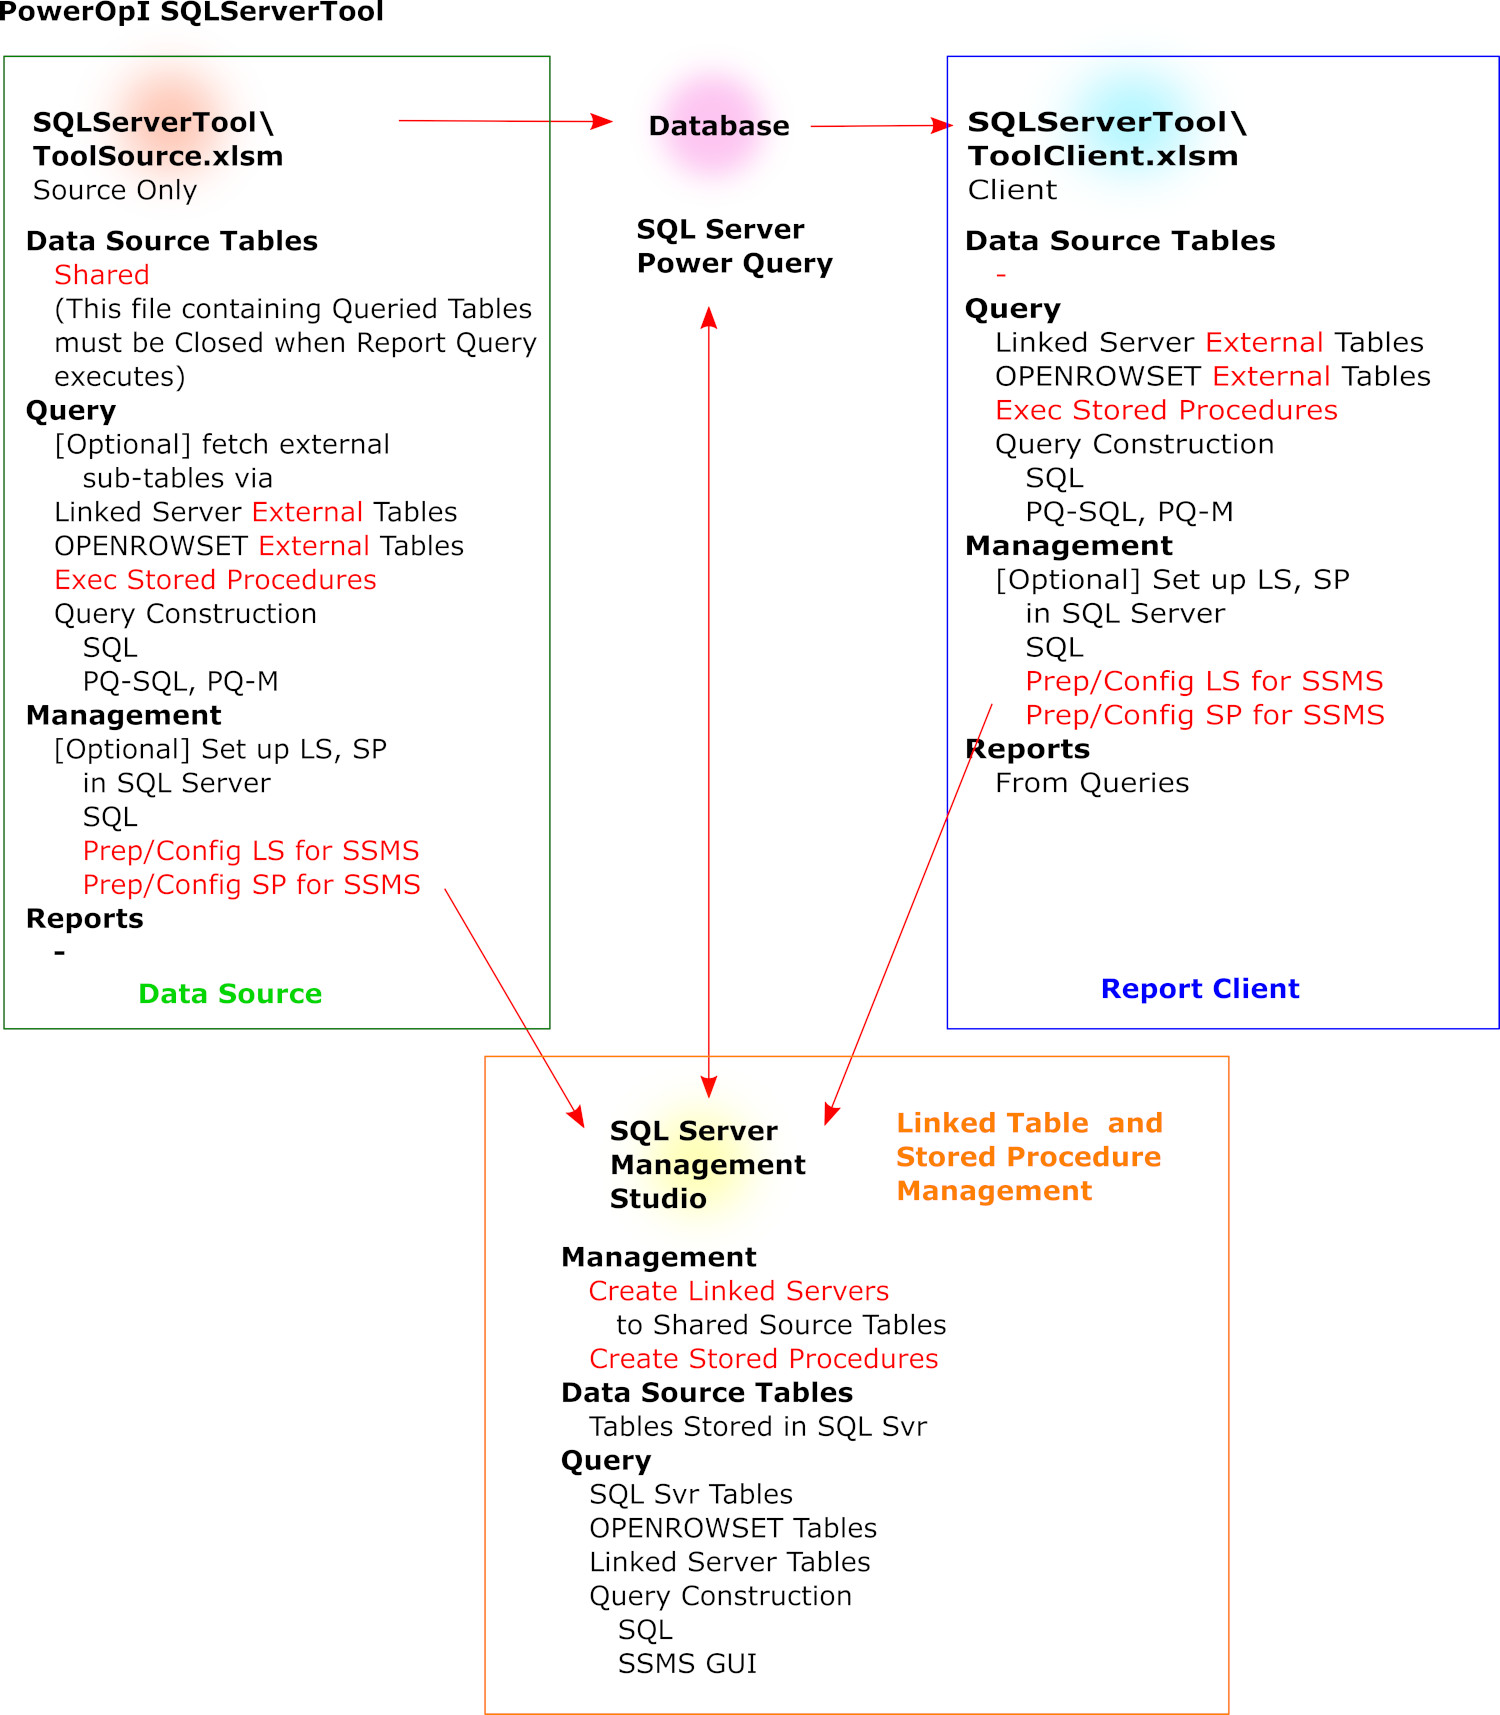
At the other end of the spectrum is SQL Server. This can run on a shared server, accessed by Clients of different environments (Windows, Macintosh etc.). SQL Server supports Stored Procedures and Linked Servers so QUERY details can be "hidden" behind house QUERYs, somewhat simplifying security and sustaining. SQL Server requires considerable setup. SQL Server has many security hooks. Your implementation would use SQL which is broadly understood and documented. You don't need complex SQL to do the PowerOpI applications; but you do have access to the full power of T-SQL. You can use M together with SQL. SQL Server is well-suited to broader client distribution across a larger, cross-functional group. And again, it's not one-sided - you can also run SQL Server on your desktop in a more tightly-controlled configuration. It may also be convenient to use PowerQuery alongside, to support transformations and file import etc.
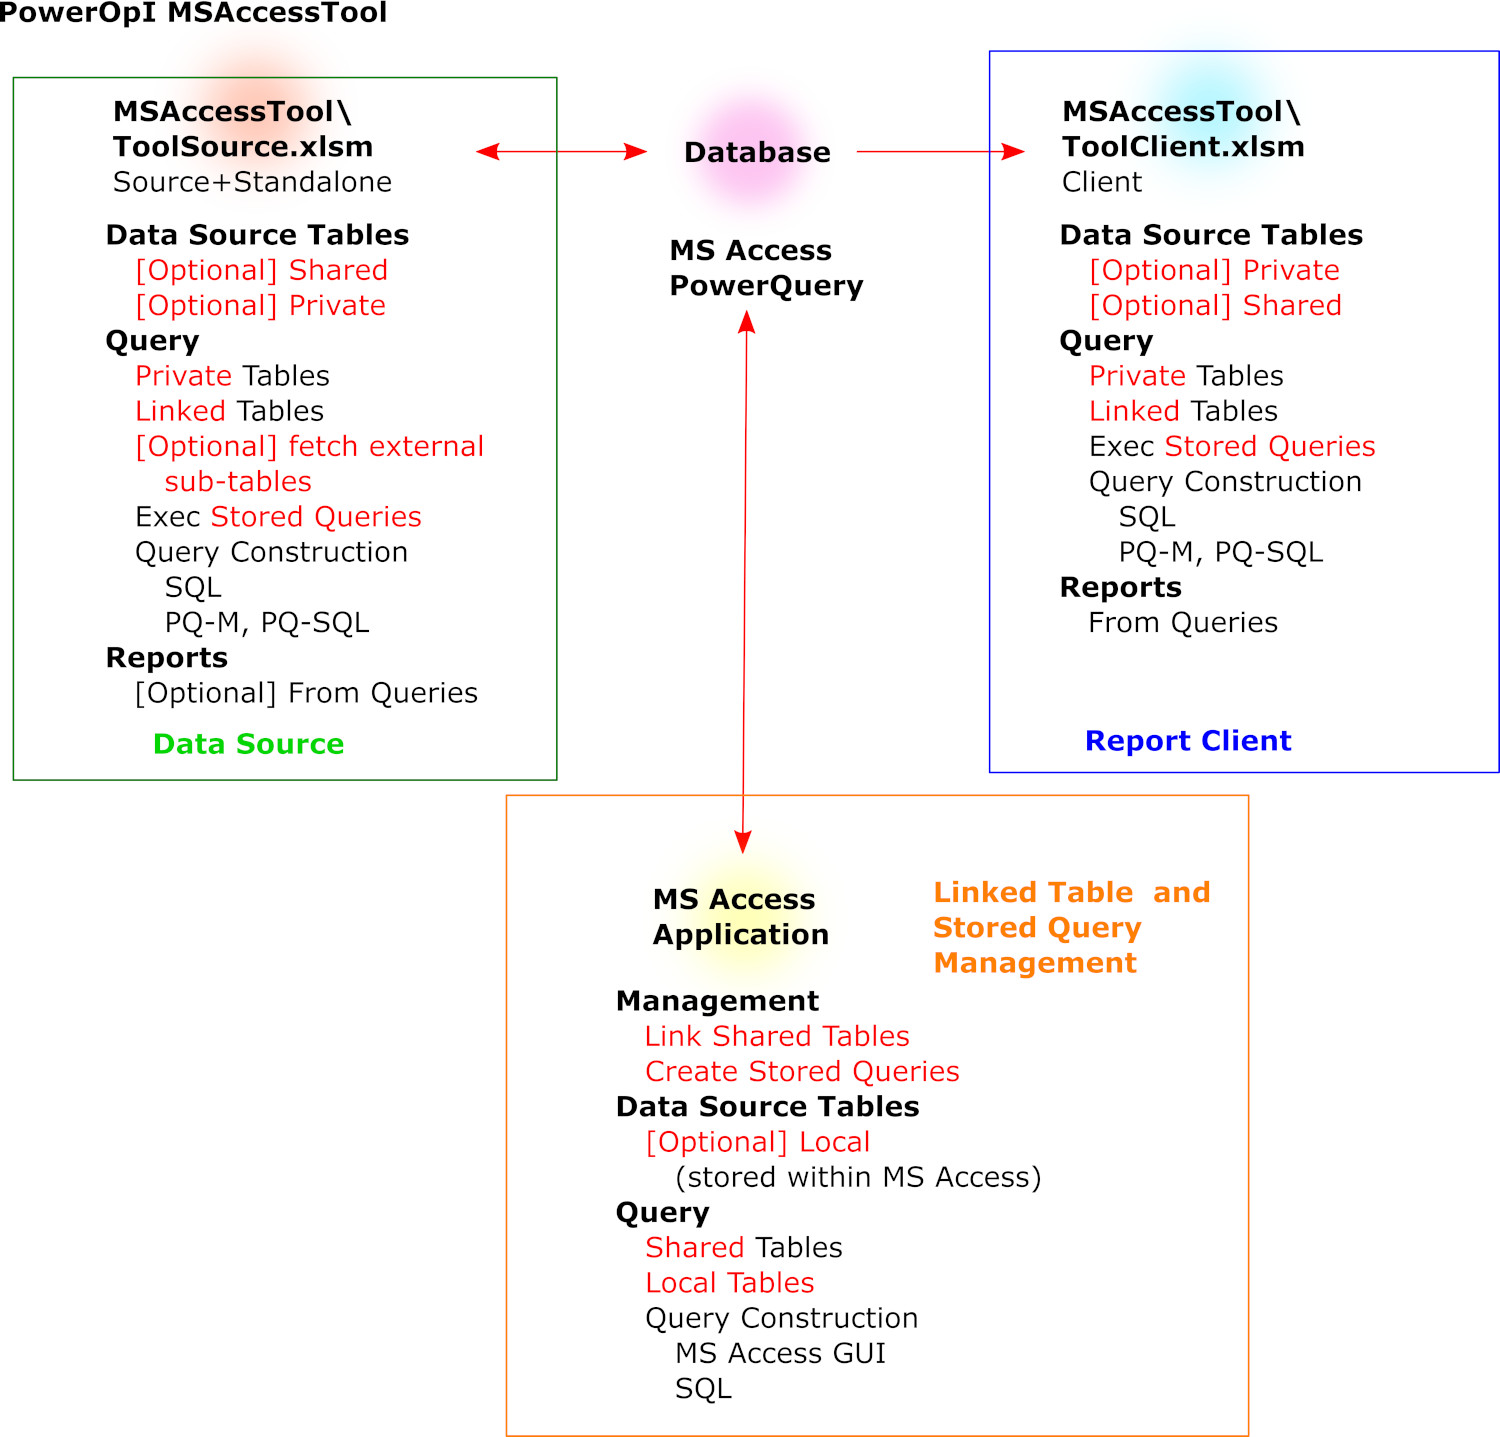
MSAccess is between those endpoints. It's included with many Office distributions (Microsoft 365) and requires no setup. It uses SQL which is well-understood (complexity not required for PowerOpI, and core function and references are provided). You can use SQL together with M. Linked-file setup is manual which can be a pain especially with distributed Clients. Access supports stored QUERYs, thereby "hiding" QUERY structure and file structure and simplifying sustaining and security. Clients can be distributed, but Access runs on each Client so QUERY structure can become visible.
I don't yet have an implementation using Web tools (Azure, Big Query, Sheets, SmartSheet et al.) but looking at it.
PowerOpI PowerQueryTool
Instance of PowerOpI Framework focusing on Power Query
Instance configured for Standalone use, and for use as Data Source; plus Instance configured as distributed Report Clients.
Demo project based on Excel Structured Tables, Joined via PowerQuery M. Demo project illustrates Program Management Logistics project (program schedule, equipment use, structure, builds, expense and capital acquisition, and distribution), showing methodology extensible to organizational management topics such as Supply Chain, Financial Management, organizational structure and staff assignment.
PowerOpI Support for PowerQuery (M-only in free version).
Logistics example Demo Project Data Source Tables With JOIN Keys.
PowerQuery Query & Connection manager.
PowerQuery M Formula Language QUERYs.
PowerQuery M-Formula Language Configured-Query editor, with Common Configuration Variables.
Integrates MSProject and MS Visio for use with PowerOpI Framework, PowerQueryTool, SQLServerTool, and MSAccess Tool
PowerOpI Support for MS Project date input and MS Visio image output.
Project
MS Project Rollup with Calendared-Resource file and two inserted Subprojects.
MS Project Rollup Task Data Export file for use with MS Visio Image, and with PowerOpI Data Source.
Visio
MS Visio Image source file samples, linked from Task Data Export file from MS Project, and linked from PowerOpI data source ToolSource file and from report client ToolClient file.
MS Visio Images Exported as .gif, .pdf, .png.
Download
A download link for Framework for MS Project and MS Visio is shown for each PowerOpITool distribution.
Instance of PowerOpI Framework focusing on SQL Server, via Data Connection and Power Query
PowerOpI Framework for SQL Server with Demo Project. Includes instances for Shared Data-Source with distributed Clients.
Demo project based on Excel Structured Tables, Joined via SQL Server. Demo project illustrates Program Management Logistics project (program schedule, equipment use, structure, builds, expense and capital acquisition, and distribution), showing methodology extensible to organizational management topics such as Supply Chain, Financial Management, organizational structure and staff assignment.
Support for QUERY / JOIN using SQL Server via Data Connections (with SQL), and via PowerQuery (with M and SQL).
Support to CREATE, INSERT VALUES, and DROP tables.
Support for connection via OLEDB and ODBC.
Sample SQL QUERYs and M QUERYs, with access to various file types and databases, for use of direct QUERYs from Excel, Stored Procedures, Linked Servers, and OPENROWSET.
Sample SQL QUERYs, and M QUERYs with and without embedded SQL, and configured coherently using Common Configuration Variables.
Sample QUERYs for setup via SQL Server Management Studio (SSMS) / Visual Studio / SQL Server Data Tools (SSDT); configured coherently using Common Configuration Variables.
New in v3.4: Support for Table push up to SQL Server.
New in v3.4: Supports OLEDB for Microsoft native database and files, and ODBC for non-Microsoft database such as MySQL.
SQLServerRemote includes configuration and tool elements for access to common SQL Server instance by remote PowerOpI clients on separate client computers on the same network (e.g., an office environment).
Instance of PowerOpI Framework focusing on MS Access, via Data Connection and Power Query
PowerOpI Framework for MS Access with Demo Project. Includes Standalone instance, and instances for Shared Data-Source with distributed Clients.
Demo project based on Excel Structured Tables, Joined via MSAccess. Demo project illustrates Program Management Logistics project (program schedule, equipment use, structure, builds, expense and capital acquisition, and distribution), showing methodology extensible to organizational management topics such as Supply Chain, Financial Management, organizational structure and staff assignment.
Support for QUERY / JOIN using MS Access via Data Connections (with SQL), and via PowerQuery (with M and SQL).
Data access via Linked Server to Excel files. PUSH functionality is not functional.
Sample SQL QUERYs and M QUERYs, with access to various file types and databases, for use of direct QUERYs from Excel, and Stored QUERYs.
Sample SQL QUERYs, and M QUERYs with and without embedded SQL, and configured coherently using Common Configuration Variables.
Instance of PowerOpI Framework focusing on SQLServer Security for Multi-User Shared-Server configurations.
Set up and manage Server Logins, Database Users, Permissions, Server Roles, Database Roles, Database Domains.
Driven from Tables in Excel that may be pushed into SQL Server.
Support to CREATE, INSERT VALUES for security tables, and DROP tables.
Configurations support upload of Security tables to target database, protected by security; and ability to execute security procedures (Login creation, etc.) from remote client.
Includes templates for Server Logins, Database Users, and Server and Database Roles for OpIClientRemote, OpIClientLocal, OpIDataOwner, OpIManager, and OpISuper.
Executed in T-SQL provided, to be run in SQL Server Management Studio.
Provided SQL can also be used a reference, illustrating: Use of SQL Variables, Cursors (Iterators), SQL Server system tables, complex Query syntax, WHILE constructs, IF EXISTS constructs, Temporary Tables, use of COUNT, SQL TRY/CATCH with error handling and reporting, Dynamic SQL creation using CONCAT; and more!
Functional to connect to and query MySQL. Not as fully developed as tools for SQL Server, but nevertheless functional for distributed project management.
Support to CREATE, INSERT VALUES, QUERY, and DROP tables, from remote client.
Windows: PowerQuery is fully supported on Windows, and PowerOpI PowerQueryTool has been tested with Microsoft 365 Excel Apps for Enterprise on Windows, along with MS Project, MS Visio, MS Access and SQL Server. PowerQuery is available on various Excel versions, with varying connectivity support.
Excel for Mac: PowerQuery is partially supported in Excel for Mac. QUERYs can be refreshed from Excel for Mac for a limited set of data sources which does include .xlsx. Excel for Mac does not support authoring of QUERYs, but they can be created in VBA. This PowerOpI PowerQueryTool provides M authoring from Excel, and creates QUERYs via VBA that use them. So this might be a path that supports authoring on Mac. However, PowerQueryTool has not been tested on Mac. Microsoft Support note re PowerQuery on Excel for Mac. If you have any result from trying PowerQueryTool on Excel for Mac, please contact me and I'll post status here.
Microsoft Project is available for MacOS so may be available to provide schedule data for PowerQueryTool; if not, you could reference the exported .xlsx file. MS Visio is not available for Mac, but Mac can view its exported image files.
As you place the files on your system from both downloads, please read the ReadMe file in each download. TAKE NOTE of the procedures in sections DEMO INSTALLATION and CONFIGURE THE DEMO INSTALLATION to configure the Install folder, and for configuring each element of the tool.
Files for both the PowerOpITool (PowerQueryTool, SQLServerTool, etc.) and the Framework for MSProject and MSVisio should all be placed into the same directory, not distributed among sub-directories. The install directory name will be used as the Project Name. The Excel zip files include a stub for MS Project, so that you can look at the Excel elements without setting up Project or Visio until you're ready to try scheduling and visualization. (PowerOpIxxxxTool_MPP.zip will overwrite some files from PowerOpIxxxxTool_XL.zip; but you can deny this if you've modified those files.)
PowerOpI website is at www.softtoyssoftware.com and provides tons of backup material and links. Capabilities of the PowerOpI Framework are described in detail at vbaConnection. Tips and troubleshooting can be found at vbaConnection.htm#troubleshooting. As needed, I'll update the Blog page with any additional support notes.
Some Logistics
PowerQuery. The PowerQueryTool is an instance of the PowerOpI Framework containing functionality for PowerQuery, a capability within many versions of Microsoft Excel. It includes a small demo project that you can examine, and could use as the basis for your project. This distribution will support a much larger project than the included demo. The methodology of JOINed tables also transcends the included demo project, and can be generally useful.
MS Access and PowerQuery are included in Microsoft 365 Tools for Enterprise
Within Excel File > Options > Trust Center > Trust Center Settings... >
> Trusted Locations (PowerOpI directory at least) > Add new location... > add path, and checkmark "Subfolders of this location are also trusted" and checkmark "Allow Trusted Locations on my network for remote access"
> MacroSettings select "Enable VBA macros", and checkmark "Trust access to the VBA project object model"
> External Content Select "Enable all Data Connections" (others may also be enabled by other processes)
In Excel, allow Native Queries
Data menu > Get Data > Query Options >
GLOBAL >
> Data Load > select "Detect column types..."
> Security > UN-checkmark "Require user approval..." under Native Database Queries
CURRENT WORKBOOK >
>Data Load > checkmark "Detect column types..." under Type Detection
If using PowerQuery connections, re-verify or update permissions in Excel for existing Data Source Settings (if any)
In Excel, Data menu > Get Data > Data Source settings...
Select Data sources in current workbook and review, re-verify or update Data Sources as needed if they are used by PowerQuery in this workbook.
Data source may be listed as <servername>\<sqlserverinstancename> or <servername>\<sqlserverinstancename>.<databasename> depending on level at which access security is granted.
For Data sources on current computer (i.e. servername = current computer) typical values may be: Edit Permissions... > Credentials Edit... > Windows > Use my current credentials, Un-check "Encrypt connections", select Privacy Level "None". You may wish to set more restrictive permissions.
For Data sources on a remote computer (i.e. servername <> current computer) typical values may be: Edit Permissions... > Credentials Edit... > Database > Username and password to server (initial defaults for PowerOpI tools are "ProgramManagement" and "abcd%12" not including the quote characters), Un-check "Encrypt connections", select Privacy Level "None". You may wish to set more restrictive permissions.
Select Data sources in Global permissions and review, re-verify or update Data Sources as needed if they are used by by all PowerQuery clients on this computer.
Settings choices are same as listed just above for Data sources in current workbook
Setup Legacy Data Import Wizards
This is a convenience to allow manual set up data connections from the Excel User Interface.
Excel File Menu > Options > Select Data Pane > Show legacy data import wizards > Select as needed. Typically Access, Web, Text, SQL Server, Data Connection Wizard.
social.technet.microsoft.com (Setup for server system firewalls such as Windows Defender, Norton Security, et al. The link shows procedure for Defender setup. Description below is based on Norton.)
ApexSQL Tools The early parts of this article are directly relevant; the later parts are specific to ApexSQL Tools which are outside the scope of this website.
Configure SQL Server for Remote Access, on the computer hosting the SQL Server Instance.
In SSMS, connect locally to SQL Server instance.
Right-click <Server Instance Name> (e.g. "COBALT\SQLEXPRESS") in SSMS Object Explorer > properties > to Server Properties pane.
Connections page Set check-mark "Allow Remote Connections to this server".
Security page Select "SQL Server and Windows Authentication Mode".
Permissions page will be set up by SQL Directives later when setting up Users and Permissions.
Configure SQL Server Network Access
SQLEXPRESS default installation uses Dynamic Ports, out-of-scope for this website. You must re-configure SQL Server to use the default port 1433.
On computer hosting SQL Server Instance
In Computer Management Console "%windir%\system32\compmgmt.msc /s"
Select Services and Applications/Services/SQL Server(<Instance such as "SQLEXPRESS">) and set Log On Property to Built-in account LocalSystem
Then re-start the SQL Server service. For reference, the LocalSystem login is the NT Authority\System login within SQL Server Security.
Similarly, set the LogOn property for SQL Server Browser to .\<computer sysadmin login name> with its password.
Set the LogOn property for SQL Full-text Filter Daemon Launcher (<instance name as above>) to NT Service\MSSQLFDLauncher$SQLEXPRESS
Set the LogOn property for SQL Server Agent (<instance name as above>) to built-in account Network Service.
To use PowerOpI SQLServerRemote ToolClientRemote from a client computer:
On the computer hosting SQL Server Instance, either:
Windows Start > Programs > Microsoft SQLServerManager15 or SQL Server 2019 Configuration Manager (as installed) or
Windows Start > Programs > Windows Administrative Tools > Computer Management > Services and Applications > SQL Server Configuration Manager
Open SQL Server Network Configuration > Protocols for <server instance> such as (SQLEXPRESS)
Enable TCP/IP
Right-Click TCP/IP and select Properties
On Tab "Protocol" set Listen All to Yes.
On Tab "IP Addresses" scroll down to "IPAll"
Set TCP Dynamic Ports to blank (delete the "0")
Set TCP Port to 1433
Click OK
Connection as, for example, "XANADU\SQLEXPRESS" connects via default Port 1433. To use a different port for security reasons, specify it and connect as "XANADU\SQLEXPRESS, 1527" to direct use of port 1527 configured in IPAll.
Re-Start SQL Server Services
Select SQL Server Services > right-click SQL Server <Server instance name such as SQLEXPRESS>;
Select Re-Start. May take a couple of tries if it times out.
Configure Firewall Access
On computer hosting SQL Server Instance, create the following settings in the Firewall in use (Microsoft Defender, Norton 360, et al.):
Program Control
SSMS C:\Program Files (x86)\Microsoft SQL Server Management Studio 18\common7\IDE\Ssms.exe Allow, In/Out (to/from), Any Computer, All Protocols
SQL Server C:\Program Files\Microsoft SQL Server\MSSQL15.SQLEXPRESS\MSSQL\Binn\sqlserver.exe Allow, In/Out (to/from), Any Computer, All Protocols
SQL Server Telemetry Client C:\Program Files\Microsoft SQL Server\MSSQL15.SQLEXPRESS\MSSQL\Binn\sqlsqlceip.exe Allow, In/Out (to/from), Any Computer, All Protocols
SQL Browser Services C:\Program Files (x86)\Microsoft SQL Server\90\Shared\sqlbrowser.exe Allow, In/Out (to/from), Any Computer, All Protocols
Traffic Rules
SQL Server TCP, UDP Ports 1433, 1434, 135
Allow, In/Out (to/from), Any Computer, TCP and UDP, Local and Remote
local ms-sql-s (port 1433)
local ms-sql-m (port 1434)
local epmap (port 135)
remote ms-sql-s (port 1433)
remote ms-sql-m (port 1434)
remote epmap (port 135)
SQL Server UDP Ports 500, (4500 if used)
Allow, In/Out (to/from), Any Computer, UDP, Local and Remote
local isakmp (port 500)
local port 4500
remote isakmp (port 500)
remote port 4500
MySQL and Other Common Function
MySQL Server C:\Program Files\MySQL\MySQL Server 8.0\bin\mysql.exe Port 3306, All Protocols, In/Out
MySQL Workbench Port 3306, TCP/UDP, In/Out
File Share
SMB, CIFS: Port 445, TCP, In/Out
RPC: Port 135, TCP, In/Out
File/Print: Port 139, TCP, In/Out
PowerOpI Directory (create) includes a Project Directory for each organizational Project to be handled. Reference: Where to Install.
You create the PowerOpI Directory, and create each organizational Project directory within it
Choose database configuration, and download from powerquerytool.
Into EACH organizational Project directory, you install the PowerOpI tool intended for use by un-zipping the two zip files downloaded into the Project file
xxx_XL.zip
xxx_MPP.zip
Second zip file un-zipped into a Project Directory will overwrite one file duplicated between these two files
Each organizational Project directory can include any other Project directories useful to the Program Manager - Docs, Reports, Tools, Configs, Suppliers
Installation of ToolClientRemote on each remote client computer
ToolClientRemote must be installed within a directory named the same as its related Project directory that is on the server computer containing ToolManagement, so that ToolClientRemote can connect properly to database entities including Linked Servers that have been set up by ToolManagement for that Project.
The directory containing ToolClientRemote can be located anywhere in the file structure of the client computer.
Fileshare/SMB Windows and Network Directories as necessary to users of the PowerOpI Project files
For Data Edit access to ToolSource to Source parties.
For Remote Client Access to viewers.
For RDT access to PowerOpI to Source parties and to Admin.
SQLServerRemote file ToolManagment.xlsx is administrative and will probably only be made accessable on its installation directory to yourself and a backup admin.
For SQL Server Remote, set up RDT access to the server computer hosting SQL Server, if needed from the manager's client computer.
Check PowerOpI Common Variables
When opening a PowerOpI tool file (ToolManagement, ToolSource, ToolClient, or ToolClientRemote), first close any other Excel file open on that computer, that is sourced from another Directory Root (e.g. "F:\...") or another computer (e.g. \\OTHERCOMPUTER\...). When files are open from sources with a different Root, Excel can't tell the directory path reliably to your file. That doesn't matter except when Excel is working out addresses and paths, which is just what it's doing when setting up connections to databases...
Once PowerOpI Tool files are installed into each Program directory, with security and access set up, open each file and verify values on the Variables tab.
Check the Variables in each file: ToolSource, ToolClient, ToolManagement, ToolClientRemote. Each tool attempts to locate itself and to set variable values consistent with the installation. But you may need to (for example) values defining a Linked Server if it needs to reference a file in a different directory.
If any values are updated, the red flag at the top of the tab will light up. If that is so, press the Update button next to it to update the Variable values, and to turn the flag green.
See the note below for more detailed instructions.
Link MS Visio files
Images can be linked to Tables exported from MS Project showing the Program sequencing, dependencies and dates, and will be dynamically updated as the MS Project plan is updated. (You could further develop different images relevant to your Program linked to different Program data.) There is a separate .vsdm file for each Visio figure in the project. Figures are usually linked to a table in ToolSource.xlsm that holds the current imported state of the MS Project plan exported to file P0001_Rollup.xlsx; or to any ToolClient for local image tracking. Each .vsdm file must be linked using the following procedure.
In the distributed PowerOpI tools MSAccessTool, PowerQueryTool, SQLServerTool and SQLServerRemote, there are three .vsdm files included. One connects to the .xlsx file exported from MS Project as shown in the procedure following. One links to a Table in ToolSource and the third links to a Table in ToolCLient. As you follow the procedure below, note the file address and update it appropriately; and the Table name. The .xlsx linkage is to an Excel Tab. The others are to a Shadow Range for a Table in each source file.
Open a Visio .vsdm image file.
Visio Ribbon Data > Show/Hide section > Checkmark External Data Window.
In the opened External Data window, right-click > Configure Refresh...
Click the Change Data Source... button > Microsoft Excel Workbook > <ProjectFileName>.xlsx (browse to the Network path to the exported file) > "Task_Table1$ (worksheet)". (For Data Source files supporting data sources as Structured Tables, ToolSource.xlsm creates a Shadow Range for each Table that can be selected in Visio instead of the Tab delection required for Task_Table1$.)
Checkmark "first row contains column headings", Rows to include (All Data) > Uniquely Identified checkmark "UniqueID".
After Dialogue Boxes are Closed, Right-Click External Data Window and Refresh Data...
Repeat for each Visio Image file.
Each .vsdm file contains a macro to export the image to .gif, .pdf, and .png.
MS Project files
These files should remain linked without need for modification. Note that in the download PowerOpI Tool distributions, several individual projects (M0004.mpp, M0005.mpp etc.) are linked into a Rollup file P0001_Rollup.mpp, which also links in a Resource file P0001_Resource.mpp. This is a good structure for some distribution of schedule/plan maintenance by responsible parties. The projects included into the Rollup are linked together using the method of structuring the project files discussed on this softtoyssoftware website, and the result is exported as P0001_Rollup.xlsx for linking and JOINing into other PowerOpI tools.
Use files P0001_Rollup.mpp, P0001_Resource.mpp, M0004.mpp, and M0005.mpp as templates for MS Project, in order to inherit embedded VBA, project structure, and calendar structure. The files may be re-formatted with care. The files should remain in a common Program tools directory, which also contains the Visio and Excel PowerOpI files for the Program.
Files M0004.mpp, and M0005.mpp are inserted into file P0001_Rollup.mpp as subprojects. Your Program be planned as a single MS Project using file P0001_Rollup.mpp as its basis (you can re-name the file as needed, but the string "Rollup" should be retained in the filename to enable export). Alternatively, additional or modified Subprojects based on files M0004.mpp, or M0005.mpp can be inserted via MS Project menu "Project" > Insert > Subproject.
If Subprojects are inserted into P0001_Rollup.mpp, they should follow the structure of M0004.mpp, with milestone sections Links In and Links Out at the top of the file for linking among Subprojects. Subprojects must be linked FROM WITHIN P0001_Rollup.mpp using these milestone sections, in order to preserve linkages when changes are made. Changes to task numbers below these sections will then be "hidden" from linked Subprojects; and any changes to Links In and Links Out made within P0001_Rollup.mpp will remain linked properly.
File P0001_Rollup.mpp contains an inserted column TaskMilestone, in which you create Keys to be used to link tasks to other PowerOpI files. The Keys in the templates are formatted as Elementname:ElementRev:Milestone[:MilestoneTask] including embedded colon characters to delimit sub-fields, because that is the format of Keys used in the Excel and Database Tables in the other PowerOpI files. Keys may be any format you design, but must match among files in order to match in database JOIN operations, and Excel INDEX/MATCH or equivalent lookup operations.
File P0001_Rollup.xlsx is exported from the Rollup file P0001_Rollup.mpp, using Macro MS Project Menu "Developer" > View Macros > P0001_Rollup.mpp!ReportDatesExport. P0001_Rollup.xlsx can be imported and JOINed with PowerOpI Excel and Database Tables via Key values. Take care NOT to execute MS Project Macro deleteTask by mistake. (In all these cases, if the file P0001_Rollup.mpp is re-named, then its new name is used instead of all instances of the name P0001_Rollup.mpp just described. The new filename should retain the string "Rollup" to enable export.)
Project Resources are defined in P0001_Resource.mpp and assigned geo-related holiday calendars (CM-Asia, JDM-Taiwan, Company-USetc., reflecting extended holidays observed. These Resources are assigned in the rollup mpp, P0001_Resource.mpp.
YouTube Playlist contains detailed discussion of these points.
First, in the steps outlined below, set up Directive database management tools from ToolManagement and ToolSource, and then use the Directives from SSMS to set up the SQL Server database environment for the Project on the server computer.
Next, build and check connections in ToolSource and ToolClient on the server computer..
Then, set up instances of ToolClientRemote on client computers.
Directive names shown are from the PowerOpI distributions of SQLServerTool and SQLServerRemote. For names of Linked Servers and Stored Procedures, your Project is likely to have different names. Your Project will likely be in a Directory with a different name. Remember that names and addresses are set on the Variables tab, and QUERY names, logic and use in connections are controlled on the DataSources tab of each PowerOpI Excel tool.
Example SQL is shown on page Remote on this website, and is visible within each tool ToolManagement.xlsm, ToolSource.xlsm, ToolClient.xlsm, and ToolClientRemote.xlsm on tab DataSources which also show Connection Strings, and source for QUERYs for PowerQuery using M language.
Local or Remote Profile Each Excel file for a project (ToolManagement, ToolSource, ToolClient, ToolClientRemote) contains a Variables tab, with at least one profile labeled ProfileLocal and another as ProfileRemote2. These profiles are used when setting up Directives that use SQL to set up database infrastructure, and used in Excel to set up database connections. ProfileLocal is set up to use local addresses (like C:\directory\subdirectory\file.type). ProfileRemote2 is set up to use remote addresses (like \\VANILLA\Users\..., or VANILLA\SQLEXPRESS or 192.168.1.422:1433\SQLEXPRESS).
ProfileLocal should be selected to set up database structure including creating Directives (button Execute tblSQL #Directives) to create a database, add Linked Servers, add users, logins, permissions. ProfileLocal should also be selected when setting up connections in Excel to a database on the same server as the client (Buttons for Build+Update DATE Links, Build+Update DATA Links).
ProfileRemote2 should be selected when setting up connections in Excel to a database on a different server than the client (Buttons for Build+Update DATE Links, Build+Update DATA Links).
Close all involved Source Data files before proceeding. Access from SQL Server to open files by the following steps will fail for any linked entities such as Linked Servers or OPENROWSET SPs.
ToolManagement is provided for SQLServerRemote to set up and manage the SQL Server environment. For SQLServerTool, management functionality is more limited, and is provided in ToolSource. Management is accomplished using SSMS with Directives configured and set up for that purpose by ToolManagement and ToolSource. ToolClient and ToolClientRemote may also provide Directives, but this is discouraged since Clients typically do not have management access to the database, for better security and distributed maintenance..
Set up Directives (usually using ProfileLocal unless setting up Stored Procedures to query a database on a separate server computer)
On Server computer hosting SQL Server Instance: ToolManagement.xlsm, ToolSource.xlsm, ToolClient.xlsm
On each Client computer hosting ToolClientRemote.xlsm
From each PowerOpI Tool: ToolManagement.xlsm, ToolSource.xlsm, ToolClient.xlsm, ToolClientRemote.xlsm
Create SSMSDirectives via Tab DataSources, Pushbutton Execute tblSQL Directives
Location of Directives exported is configured on Tab "Variables", variable name "ExportTo". Its value is typically like "C:\Users\Owner\Documents\SQL Server Management Studio\SQLServerRemote\ToolManagement\ProfileLocal", including the name of the Database ("SQLServerRemote"), the name of the PowerOpI tool ("SQLServerRemote"), and the configuration profile in use in the PowerOpI tool ("ProfileLocal").
These Directives can be loaded by the SSMS File > Open > Folder > ... sequence. It's convenient to create a shortcut to the root of the path containing directives into the SSMS Menu Bar.
Directives may be provided, or created for your Project, for any of the PowerOpI tools. Use the "Execute tblSQL Directives" pushbutton in each PowerOpI tool on its DataSources tab to create Directives for each tool.
Directives are defined by including the string #VBTEXTJOIN: EXPORT, or #VBTEXTJOIN EXPORTWITH <schema-name>, enclosed within SQL comment delimiters. As with all SQL expressions in tblSQL, you can see how such statements are created using tool Variables for configuration.
Create the Project Database (one or more) (using ProfileLocal)
From SSMS on server computer, open Export Directory for ToolManagement (for SQLServerRemote) or ToolSource (for SQLServerTool) for the Project and run Directive
CREATE_Server1DatabaseName1.sql
This procedure will only create the database if it does not already exist, to protect existing SPs in its Programmability directory. The following steps will re-create SPs for this database that may have been changed due to Variable value changes (such as filepaths).
Create Users, Logins, and Permissions (using ProfileLocal)
From SSMS on server computer, open Export Directory for ToolManagement (for SQLServerRemote) or ToolSource (for SQLServerTool) for the Project and run Directives:
qSetPermissions.sql to set up Windows security logins (in ToolManagement or ToolSource).
CREATE_LoginAndUser_SSMS.sql to set up SQL Server security logins for remote access (in ToolManagement, for SQLServerRemote only).
CREATE_LoginAndUserPermissions_SSMS.sql to set database access and permissions for SQL Server security logins (in ToolManagement for SQLServerRemoteonly).
Configure the SQL Server ACE Provider (using ProfileLocal)
From SSMS on server computer, open Export Directory for ToolManagement (for SQLServerRemote) or ToolSource (for SQLServerTool) for the Project and run Directives:
CREATE_dbo.spConfigACE.sql to set up an SP which is called from other SPs
Create Linked Servers (one or more, to update filenames and paths) (using ProfileLocal)
From SSMS on server computer, open Export Directory for ToolManagement (for SQLServerRemote) or ToolSource (for SQLServerTool) for the Project and run Directives:
CREATE_LS_ToolSource.sql and
CREATE_LS_P0001_Rollup.sql
(and/or all properly-named LS_ProjectName_LSNames) linked servers for your project, to build or re-build the Linked Servers. Check the Linked Servers by following down the path in SSMS Server Objects > Linked Servers > (expand each Linked Server) > Catalogs > default > Tables which will expand to list all Tables and Named Ranges accessible through that LS if it is working properly.
Linked Server names actually created include the Project name doing the creation and filename referenced, e.g.LS_SQLServerRemote_P0001_Rollup.
Finally, remember that you must create a Linked Server for each Data Source file to be accessed. That Linked Server will be able to access all Named Ranges and Worksheets within its linked file. You can use Shadow Ranges described just below, to make Excel Structured Tables visible to SQL Server Linked Servers or OPENROWSET, and as MS Access Linked Tables.
Create Stored Procedures (one or more, that use Linked Servers, or OPENROWSET; to update filepaths) (using ProfileLocal for queries aimed at a database on the same server machine, or ProfileRemote2 when setting up Stored Procedures to query a database on a separate server computer)
From SSMS on server computer, open Export Directory for ToolSource (for both SQLServerTool and SQLServerRemote) for the Project and run Directives:
CREATE_spUnionGroupToolSource.sql
CREATE_spUnionQueryLS_ToolSource.sql
CREATE_spBuildPlanLS_ToolSource.sql
CREATE_spPushTablesLS.sql
CREATE_spPushTablesOPENROWSET.sql
CREATE_spBuildPlanTable.sql
CREATE_spUnionGroupTableSSMS.sql
Stored Procedures created by these Directives will include the name of the Schema name, Linked Server name which includes the Project name, and PowerOpI tool filename (e.g., ToolSource) within the name of the SP actually created, e.g.: dbo.spBuildPlanLS_SQLServerRemote_ToolSource; calls to the SP must use the created name.
ToolSource allows data owners to update data, to set up new QUERYs, to set update or set up new QUERYs using the Tables, and to push the Tables to the SQL Server instance.
You should name your SPs with a preceding "sp". Don't use "sp_" though, which is reserved for system procedures. Check that the SPs were correctly created and that configuration is correct for each, by following down the path in SSMS Databases > (databaseName) > Programmability > Stored Procedures which will list SPs for that database. (right-click) > Modify shows you the source SQL for each.
Next, setup Date and Data connections (using ProfileLocal for queries aimed at the same database server machine, or ProfileRemote2 for queries aimed at a database on a separate server computer) in the PowerOpI Tool files ToolManagement.xlsm, ToolSource.xlsm, ToolClient.xlsm,and ToolClientRemote.xlsm. In each case you can see the connection setup being processed in the lower left corner of the Excel pane. Wait for each operation to complete before clicking a button for the next operation.
On the Server computer
On ToolManagement, tab DataSources, click Build+Update DATE Links and then click Build+Update DATA Links.
On ToolSource, tab DataSources, click Build+Update DATE Links and then click Build+Update DATA Links.
On ToolClient, tab DataSources, click Build+Update DATE Links and then click Build+Update DATA Links.
On each computer hosting TooClientRemote.xlsm
On ToolClientRemote, tab DataSources, click Build+Update DATE Links and then click Build+Update DATA Links.
If the link re-builds fail, remember that ToolClientRemote must be within a directory on the client computer where that directory is named the same as its Project on the server computer.
User Login
On ToolManagement.xlsm, ToolSource.xlsm, ToolClient.xls on the Server computer default login is Windows security and can be left there.
For a full security setup that would cover a remote, shared SQL Server database with multiple login clients as well as other full-function configurations, set up security as described on the Database Security page, using instructions at Database Security Accordion. This setup includes server logins and roles, database users and roles, database schema, and more.
Connections from ToolClientRemote will ask for SQL Server login credentials. Logins for remote use without Windows security, created above, are ProgramManagement and ProgramManagement2, both with password "abcd%12" for the downloaded template Project. On initial Template setup, use these names and passwords to get the tools working. When customizing for your Project, please change the user names and passwords away from these defaults.
Connections involving PowerQuery will ask on set-up for credentials to login to SQL Server. Most common answer is Windows Current User login credentials (radio button); otherwise enter server-specific credentials for that user. This is repeated for both PowerOpI Data Source setup, and Client setup (stated in next paragraph).
Normal Use
When Access and Visio linkages, and Excel Variables, SPs, LS, DATES and DATA have been updated and refreshed, the Project should be functional, and you can add/update/delete Excel tables, and click Refresh DATES and Refresh DATA as needed to incorporate updates into Reports. Once structure and paths are set up, it remains quite stable and absorbs subsequent changes well.
The environment is now set up and should refresh and import Dates and update Pivot reports, using the ToolClient Refresh DATE and Refresh DATA pushbuttons. Use the pushbuttons rather than Refresh All from the Excel toolbar, to avoid refreshing dead links resulting an error report.
MS Access Data Source connections Each database environment behaves differently in connecting data sources. MS Access must be manually set up, on each install including each local, shared, and client installation.
Linking MS Access Data Source Tables
Re-Link Existing Tables
MS Access Menu External Data > Linked Table Manager > checkmark Data Source(s) listed > Edit >
Update path and filename as needed to locate current location of Data Source file. If updating a downloaded MSAccessTool instance installed in C:\Users\<username>\Documents\PowerOpI\MSAccessTool, you probably only need to update the <username> part of the path, click "Save" and "Close". In other cases, you may need to update more of the path and/or filename.
If several different paths are listed, you will have to update each. If several are the same, you can checkmark them, Edit and update them together. If several are different, checkmark them one at a time, Edit, and then move on to next.
Link in New Tables
Each Data Source table must be linked individually, even if they exist within one file such as a ToolSource.xlsm file. MS Access Menu External Data > New Data Source > From File > Excel > enter File name: and path > and select "Link to the data source by creating a linked table" > OK.
Select Show Named Ranges and select "rng<tablename>" (which is a "shadow range" name created by ToolSource) and "OK". (A Shadow Range is created by ToolSource.xlsm for each Structured Table used; MSAccess can't see Structured Tables directly so PowerOpI ToolSource creates these Shadow Ranges to make them visible.)
Using Network Addresses vs. Local Addresses
If you are using MSAccessTool only on a single computer with no remote Client computers, you can use local addresses to link Tables (e.g., C:\Users\<username>\Documents\PowerOpI).
If a client on a remote computer connects to MSAccessTool, it does so by opening the .accdb file that resides on the Server/data source computer (location set by MSAccessTool\ToolClient.xlsm Variables definition); and that file opens in MSAccess on the Client computer, not the Server computer. (The directory containing the MSAccessTool .accdb file must be shared in Windows to Client computers.)
The Client computer must access the Data source tables that reside on the Server computer, so the .accdb file link to each Table must use the Network Address of the Server computer. The Network address looks like \\SERVERNAME\Documents\PowerOpI\MSAccessTool\ToolSource.xlsm (In this example the Documents directory is shared to Client computers.) The Network address can be determined from Windows File Explorer > left pane > Network >\\SERVERNAME > Share Name; Sub-path to MSAccessTool directory > filename.
And, of course when re-linking Data Source files if the .accdb file is moved, the Network Address including \\SERVERNAME and Shared Directory name of the Data Source file(s) must be updated in that process.
If you use the Network address of the local computer to access Data Source files on the same local machine, and if the network is not operating (such as on a Laptop in a location without network connectivity), the local connection may not function. This is a property of Windows networking... If it's local to the Data Source files, a Client should use the Local address (C:\...).
Once Linked, the Tables will appear in the MS Access All Access Objects left pane as Tables, each by the name created as it was linked (e.g., "rng<tablename>" showing the Shadow Range names). Double-clicking a Table name in that pane displays the Table content. The linked Tables are available for QUERY creation in the MS Access Design View editor, or SQL View editor, or in direct Query connections from a Client such as PowerOpI MSAccessTool ToolClient.xlsm.
Re-build Connections to reflect the current directory structure
Close MS Access before proceeding with Excel Connection Setup.
Build Connections in Excel, as follows:
In ToolSource, click Build+Update DATE Links and then click Build+Update DATA Links to build the connections in the current directory structure.
In ToolClient, click Build+Update DATE Links and then click Build+Update DATA Links to build the connections in the current directory structure.
The environment is now set up and should refresh and import Dates and update Pivot reports, using the ToolClient Refresh DATE and Refresh DATA pushbuttons. Use the pushbuttons rather than Refresh All from the Excel toolbar, to avoid refreshing dead links resulting an error report.
Any ToolClient.xlsm for MSAccessTool installed on a remote client computer must be installed within a Windows directory named the same as the same Project set up in the common server computer. Variables must be checked, and DATE and DATA connections must be re-built.
Before using a remote client, connect the remote client computer via filesharing (use the Network connection in File Explorer) to the data source computer containing data source files and the .accdb file. After connecting, you can optionally close the File Explorer pane. The connection will need to be re-established after any subsequent re-boot of the client or data source computers.
Note also that MS Access and also PowerQuery can Query an open file. That means that a single file can host Data Source Tables, QUERYs, and Reports, all in the same file. Viewing and refreshing a report in that case means that the Data Source file is open too since it's the same file, but that's okay with MS Access and with PowerQuery. However, note that Data Source file(s) must NOT be open in MS Access at the same time the source file is QUERYed.
SQL Server, on the other hand, will NOT QUERY an open Data Source file, so a separate Client file must contain QUERYs and Reports, and the Data Source file for those QUERYs must NOT be open when a QUERY using them is executed.
PowerQuery Data Source connectionsPowerQueryTool requires much less setup than MSAccessTool and especially much less than SQLServerTool. It can provide broad data functionality within Excel, and provides connectivity to dozens of database environments and file types.
Some PowerQuery functionality is provided in MSAccessTool, SQLServerTool and SQLServerRemote that uses those respective environments, and you didn't even notice the setup! PowerQuery can "see" Structured Tables within an Excel file, so doesn't need Shadow Ranges to be set up as ToolSource files can do.
However, functionality outside of Stored Procedures that reside within the database environments, is carried within each PowerQuery client file, exposing file structure and related product structure, complicating security and maintenance.
PowerQuery in Excel can QUERY an open Excel file, so a single PowerQueryTool file ToolSource or ToolClient can host Data Source Tables, QUERYs, and Reports all in a single file. Clients can access Tables from a common Data Source. And PowerBI Desktop can QUERY the same Data Source Tables with the same QUERY structures (in M Language, not SQL) to drive numerous analysis tools and graphics.
First
Validate Variables on the ToolSource Variables Tab.
In ToolSource, click Build+Update DATE Links and then click Build+Update DATA Links to build the connections in the current directory structure.
Then
Validate Variables on the ToolClient Variables Tab.
In ToolClient, click Build+Update DATE Links and then click Build+Update DATA Links to build the connections in the current directory structure.
Finally
The environment is now set up and should refresh and import Dates and update Pivot reports, using the ToolClient Refresh DATE and Refresh DATA pushbuttons. Use the pushbuttons rather than Refresh All from the Excel toolbar, to avoid refreshing dead links resulting an error report.
You can update/add/delete Tables, and modify/delete/add new QUERYs. These are in M Language not SQL. There are examples throughout the softtoyssoftware website, and a page of references for common QUERYs
Any ToolClient.xlsm for PowerQueryTool installed on a remote client computer must be installed within a Windows directory named the same as the same Project set up in the common server computer. Variables must be checked, and DATE and DATA connections must be re-built.
Before using a remote client, connect the remote client computer via filesharing (use the Network connection in File Explorer) to the data source computer containing data source files. After connecting, you can optionally close the File Explorer pane. The connection will need to be re-established after any subsequent re-boot of the client or data source computers.
Final note - You can do M QUERYs directly in Excel. But of course, before you can use PowerQuery with a database such as MS Access and SQL Server, those database systems must be set up and linked as described in prior sections of this accordion section. The work is in setup of the database environments, not in setup of PowerQueryTool.
Microsoft PowerBI Desktop can be used as a client for PowerOpI data source files, to import files, or to drive Visuals in PowerBI from
Direct QUERYs in M within PowerBI, which may include embedded SQL.
Database QUERYs using Linked Servers in SQL Server or linked files in MS Access.
Database QUERYs using Stored Procedures in SQL Server, or MSAccess, or other database environments.
The sample project template in the distributed PowerOpI files is more suited to tables than to visuals (describing the difference between Power Operational Intelligence ("how are we going to execute") versus Power Business Intelligence ("trend analysis, prediction of results")). However, that's more a consequence of the project template provided - nothing about PowerOpI Tools limits them from PowerBI applications.
There are visuals in Excel as a report client, and PowerBI supports numerous native visuals and many more through its AppSource (PowerBI menu Home > Insert section > More Visuals > From AppSource). PowerBI doesn't directly support Pivot Tables, but you can use PowerQuery from Excel via PowerOpI PowerQueryTool. So there's overlap through interoperability.
If a PowerBI report is installed or moved to a different client computer, if its source address references files (including MS Access .accdb files), that address must be updated at the client. That would involve QUERYs to MS Access or to PowerOpI source files.
For each PowerBI Desktop report file
PowerBI menu Home > menu section Queries > Transform Data > leftmost pane Queries > Select each QUERY > Menu section Query > Advanced Editor > displays M QUERY
More elements of the path than highlighted may need to be updated depending on your specific configuration and fileshare paths.
SQL Server connections from PowerBI still address SQL Server as a Service addressed as <servercomputername>\<sqlserverinstancename> and so do not need source address update in PowerBI Desktop QUERY source statements.
To use PowerBI Desktop from a remote client computer for QUERYs of files on a source computer, a filesharing connection needs to be established from the client computer via the network address in the File Explorer to the source computer e.g. \\COMPUTERNAME\SHARENAME\path\sourcefilename.
When a QUERY is executed from PowerBI Desktop, it may ask for Credentials. For SQL Server, the defaults set up for a remote connection are SQL Server Security, User = ProgramManagement2, Password = abcd%12. (You likely changed from these defaults when your SQL Server instance was installed, and you should use the security, user, and password set up at that time.)
Where to Install PowerOpI Tools Normally, a directory is created at %user%\Documents\PowerOpI. Within that, instances of PowerOpI tools are installed. A directory is created for each organizational project to be managed; the demo project downloaded is installed into a project folder called (for example) PowerQueryTool. Once such a project directory is created, it can be re-named to identify the organization's internal project name.
A separate directory is created like this for each organizational project, and can contain other sub-directories to contain project requirements, formal documenatations, test reports and so forth. You can also change put project directories into a different directory path; you will set these paths below for PowerOpI Variables, for MSAccess if used, and for MSVisio visualization files.
Once such a project directory is established, files within it must be re-linked to work with the PowerOpI infrastructure. Start by re-linking the data source tables to the MSAccess .accdb database, if MSAccess is used, using the External Data > Linked Table Manager tool within MSAccess. The MSVisio .vsdm files must each be re-linked to the .xlsx file exported from MSProject, by right-clicking data table at the bottom of the Visio window and selecting Configure Refresh. In each of these cases, remember to update the links to validly reflect the full directory path and file names involved.
Once these files are linked, then files must be re-linked to PowerOpI files that use them in QUERYs: ToolSource, ToolClient, ToolManagement, ToolClientRemote. By the way even these files can be re-named but you must take care to link them properly as above, and also as we will describe for the PowerOpI tools.
Configuration of each of the PowerOpI files named above (or re-named by you) is accomplished for each file individually, by checking or setting the Common Configuration Variables on its Variables tab. The appropriate Profile is probably already set by the ChooseProfile list at the top of tblLocalizationConfig. You can choose and edit an alternate profile if needed.
PowerOpI Tool Common Configuration Variables
You should check each of the variable values in the column whose name is selected. These variables specify file names and paths used in links. The links are pre-set to use default file names (e.g. ToolSource.xlsm), and also default to the files being within the same directory with the PowerOpI tools. Each tool attempts to locate itself and uses that to set the directory paths.
Examine each variable in the column for the Profile selected by the Choose Profile dropdown (red border, yellow background). Do not change values in column ProfileSelect; that one chooses values to its right selected by the Choose Profile dropdown. Make sure that names and paths are correct for the local Workbook and Workstation environment, and for Servers and Files to be used and LinkedServers to be created and used. Linked Servers are used for SQL Server; not for PowerQuery or MSAccess.
If you update any values, the flag at the top of the Variables tab will turn red. So if the flag is red, please click the Update Required button at top left of the Variables tab to update the named variables created by tblConnectionConfig. The flag will turn green, and the button will change to Update Not Required to indicate that the changes have been incorporated.
When the Variables for the selected Profile have been checked, and updated if necessary, and the flag is green, select the DataSources tab in the PowerOpI tool file. On that tab, you must re-build all connections to reflect values of the Variables for the relevant file configuration for PowerOpI used on your computer. FIRST, click the "Build+Update DATE Links" button and THEN, click the "Build+Update DATA Links" button.
The PowerOpI tool then cycles through connections in tblConnectionConfig (top of tab DataSources) and processes each connection marked Build (Chosen by the Client Profile selected in the Client selection variable just above tblConnectionConfig; these can be set in columns at far right of tboConnectionConfig labeled as Build/Update Profiles and can be edited there.). The connection Build process configures and tests each marked configuration. You can watch its progress through the connections in the status area at the bottom left corner of the Excel pane. It may take a little time to complete.
When this process completes, if any errors were encountered, a window is displayed describing the error. Go back and examine Variables for files, servers etc. for which errors are reported. You may find some debug help at vbaConnection.htm#troubleshooting. More on Variables follows:
Configuration Variables A sequence using Common Configuration Variables to configure, and #Directives to set up, using the sample SQL project in the Framework files as an example, would be:
First, close all files that contain data sources to be used by PowerOpI tools, to prevent conflicts with open files as you set up MS Access and MS Visio.
Set up MS Access and MS Visio if they are used (SQLServerTool SQLServerRemote, PowerQueryTool, MSAccessTool)
Before setting up SQL Server, link Data Source files into MS Access if that is used, and into Visio diagrams based on PowerOpI Framework files.
As illustrated elsewhere on this website, updates to MS Access are done from Menu External Data > Linked Table Manager > Relink.
Remember to first close Source Data files before linking them into MS Access, and before they are QUERIED through SQL Server.
Updates to MS Visio are done from Pane External Data > right-click to Configure Refresh... > Change Data Source.... The PowerOpI Tool distributions each contain three MS Visio .vsdm files, each demonstrating linkage to a different data source: One to the .xls file exported from MS Project; one to the SQL Server source data file .xlsm; and one connected to the control file .xlsm, useful if that file is a standalone (for PowerQuery or MS Access but not for SQL Server). Each Visio .vsdm file must be re-linked individually.
If Source Data Tables are in different files than files that contain QUERYs that use them, (as necessary for SQL Server and optional for MS Access and Power Query, and would include files for client reports, and files controlling QUERYs), then execute the following steps for first the Source Data files, and then for the Client and Control files that use them. A Source Data file may pull in from a dates file exported from Project, in order to provide a Dates table that includes elements mapping to aliased dates, for use by the client and control files. If so, that necessitates the Date update steps in such a Source Data file.
Configure Variables in PowerOpI Framework files
On the PowerOpI Framework Control file Variables tab, set values for ProjectName (e.g. "Chicago"), Server1DatabaseName1 (e.g., "chicagoDB"), and domain (e.g. "guest" or "dbo").
ProjectName defaults to the subDirectoryName containing the PowerOpI File (in this paragraph, "Chicago"), and Server1DatabaseName1 defaults to ProjectNameDB again reflecting the name of the current sub-directory (in this paragraph "ChicagoDB"). Click the Update button on the Variables tab.
Check all the variables, filenames, and paths on the Variables tab. Specify Data Source filenames and paths, check Environment, Servers, Data Source Files, and Linked Server settings, and select the Profile to be set up for current use. If you make changes, click the Update button to achieve Green status.
On the DataSources tab, click button Execute tblSQL #Directives to export SQL updated to reflect the DatabaseName, Project and domain, and any affected filepaths, to the SSMS Export Directory. Usually you will set up one of the PowerOpI Tool Data Source files for this, storing the #Export Directives SQL in tblSQL in that file. Could actually be any PowerOpI file, but you probably don't want to distribute LS and SP definitions to all clients.
Remote Client Configuration, File Addressing, Logins, and Security
PowerQuery Tools for each database platform - PowerQuery, MSAccess, and SQL Server - are distributed with a ToolSource component, and a ToolClient component.
For PowerQuery and MSAccess, the ToolSource component is configured to be usable either as a Data Source for ToolClient, or as a standalone combined Data Source and Report Client. So ToolSource contains Data Source tables, limited database connection controls to pick up Date data from MS Project, and more database connection controls and Reports driven by the connections for Standalone use.
The SQL Server ToolSource also contains SQL exportable to SQL Server SSMS to set up stored queries. Also for SQLServerTool, Data Source tables are contained only in the ToolSource component, and Reports are contained only in the ToolClient component; this is to satisfy the requirement by SQL Server that external files containing Data Source tables be closed when queried. (Note an exception: There is a query in ToolSource.xlsm of an external file containing Date data to to further create the Date tables presented for ToolClient queries. That works because the file imported is neither ToolSource.xlsm nor ToolClient.xlsm, and can be (in fact, must be) closed when it is queried from the open ToolSource.xlsm.)
The ToolClient components contain connection controls appropriate to the Client, and reports driven from those connections; no Data Source tables in the Client.
The distributions are configured for the ToolSource and ToolClient to run on the same computer. Each of the distributed configurations should work fine in a single-computer configuration as distributed. It's possible that filepaths on the Variables tab could need tweaking if your configuration is not as expected by the base configuration.
But it is the intent that ToolClients can be distributed for use by Core Team members and other appropriate users in the organization. So distributed ToolClients must be configured to connect to databases and perhaps files on other computers, and SQL Server must be configured to accept connections from remote ToolClients. PowerQuery and MSAccess are pretty straightforward; SQL Server involves user Logins, Domains and IT security so is much more complicated. I'm not an expert in IT security; most likely you will need help from your corporate IT in order to use SQL Server in a distributed configuration. I'll tell you what I know (or think), and provide some helpful links. You can probably set up the SMB filesharing for PowerQuery and MSAccess by yourself.
PowerQuery Remote Client Configuration
PowerQueryTool addresses Excel files for queries, just using desktop SMB filesharing. Data source files such as ToolSource.xlsm or other files would be placed on a shared computer, and ToolClients distributed would be configured to access the files on that \\SHARED_COMPUTER.
To do that, set the Profile Path Base on the Variables tab, to Network via pulldown, for Profile chosen in cell Choose Profile near $C$13, to make the variable FileXDirectoryRoot reflect the \\SHARED_COMPUTER_NAME set in variable ServerXComputerName.
Back in Windows on the shared computer hosting the data source files, the directory for those shared files would be "shared" out with Read or Read/Write permissions to Client Logins or preferably to a GROUP to which they all belong. From ToolClients on client computers, the files should be addressed as \\SHARED_COMPUTER_NAME\Shared_Directory_Name\[path_to_file_within_shared_directory\]ToolSource.xlsm; put in the paths and filenames on the Variables tab for data source files (update using the Update Button if indicated by red flag), and use the FileXDataSource variables in queries constructed; then updates will be at least semi-automatic and coherent among queries.
One or more Data Source files could be used and addressed this way; there's not a requirement that a single file be used, or that Data source files be named "ToolSource"; you just configure the file names and paths in the Variables tab in each ToolClient distributed.
A client computer must connect to the shared computer before executing queries from its ToolClient.xlsm. This is the usual SMB fileshare connection: From the client desktop File Explorer > (left pane) Network > SHARED_COMPUTER_NAME > (Login Panel) > User Name and Password > and shared directories will be listed; that's all you need. You can close the File Explorer if desired, the connection will persist.
MS Access Remote Client Configuration
MSAccess queries also use SMB Filesharing, same addressing mechanics as described above for PowerQuery. Shared Data Source files are stored on the shared computer, but be aware that MS Access runs on Client computer (installed there as part of Microsoft 365 for the client), not the shared computer; so addresses configured into client ToolClient.xlsm must reflect their location on the shared computer as seen from the Client, as follows.
For MSAccessTool, ToolClient.xlsm on the client computer accesses the shared data tables through MSAccess using an MSAccess .accdb file. There is an .accdb file in the MSAccessTool distribution, which you store on the shared computer along with the related ToolSource.xlsm file and any other data source files you may add. The .accdb file is addressed from the client ToolClient.xlsm file by its \\SHARED_COMPUTER_NAME and path, as seen from the Client computer, not the shared computer, via the File Explorer as described for PowerQuery. It will look like \\SHARED_COMPUTER_NAME\Shared_Directory_Name\[path_to_file_within_shared_directory\]ToolSource.accdb.
Opening the .accdb file in MSAccess (from either the shared computer or a client), the shared data source tables are linked into the .accdb file one at a time using MSAccess > External Data > New Data Source > Excel Shared Files; and may also be re-linked by the External Data > Linked Table Manager. The tables linked are contained in one or more Data Source files (for example, ToolSource.xlsm), each of which may contain multiple Data Source Tables. As each table is linked, its name and the address of its containing file is specified. (MSAccess can't see names for Excel Structured Tables, so there's a Shadow Range provided by ToolSource.xlsm: if a table is named "tblAlloc" its Shadow Range is named "rngAlloc"; see Shadow Range.)
These files containing data source tables will be addressed from MSAccess running on the Client computer, not on the shared computer. So again, use their \\SHARED_COMPUTER_NAME and path as found in the client File Explorer. It will look like \\SHARED_COMPUTER_NAME\Shared_Directory_Name\[path_to_file_within_shared_directory\]ToolSource.xlsm. Again, there could be one or more Data Source files linked into Access, and it is not required that they be named ToolSource.xlsm (although that file does provide dynamically-updated Shadow Ranges to address Excel Structured Tables from MSAccess), nor that they all be stored in the same directory; you just have to configure their names and locations in MSAccess as linked tables.
In everyday operation, note that the Client computer must connect to the shared computer before executing queries from its ToolClient.xlsm.
This all probably sounds harder than it is in practice. But once set up, the links and addresses rarely touched, and even re-locating an .accdb file is easy using the MSAccess Linked Table Manager.
SQL Server Remote Client Configuration
SQL Server runs on a shared server computer, and may be accessed by distributed clients. TAKE NOTE: To use Windows Authenticated Login security (Integrated Security=SSPI in connection string), the clients must be members of the same Windows Domain as the server running SQL Server. A Windows Domain requires Active Directory on a computer running Windows Server. Many organizations have AD and SQL Server set up and available for other uses already. If Active Directory is available to you, the following link describes reasonable setup of remote client capability with SQL Server. You will likely need access and possibly assistance from IT.
I don't have Windows Server/Active Directory/Domain Controller available in my current situation. So I've dived into the scary parts of SQL Server security and configuration, and user setup and permissions, Users/logins/roles/control/execute/impersonate/trustworthy-ness et al, to develop a working setup of shared SQL Server with remote clients using SQL Server logins and security, and not relying only on AD/DC. The tool SQLServerRemote incorporates all of these, and the installation and setup procedure in the Accordion section above sets it up.
Updates on SQL Server installation and configuration for remote access.
PowerOpI new ToolManagement.xlsm, with ToolSource.xlsm, ToolClient.xlsm and new ToolClientRemote.xlsm are updated with SQL automation for user setup and permissions.
SQL automation for setup of Linked Server(s) that are set up for execution from remote client.
SQL to push Excel tables up to SQL Server tables.
SQL and PowerQuery M Direct Query of Excel files or SQL Server Tables from remote clients.
SQL and PowerQuery M Stored Procedure Query of Excel files or SQL Server Tables from remote clients.
Active Directory/Domain Controller with domain in common between Server and Clients to enable remote Client connection and query using SQL Server are available in many organizations. In that case, you should be able to proceed with shared SQL Server with remote Clients. Make a pilot program to get this functioning before committing to a distributed plan.
ToolSource Table Upload into SQL Server
PowerOpI Tool examples downloaded largely demo direct access by QUERYs to source data in ToolSource Excel files, controlled by SQL sent to SQL Server in the QUERYs. SQL supports upload of data into Tables within the SQL Server instance, by using an "INTO" clause.
For example, this SQL reads the Excel Table in rngAlloc and pushes its content into SQL Server table dbo.xlalloc. The SQL Server table is first deleted, assuming that the data in Excel is the master; then that table is re-created in SQL Server and populated with data from the Excel Table:
DROP TABLE IF EXISTS dbo.xlAlloc;

SELECT tmpAlloc.* INTO dbo.xlAlloc
FROM LS_SQLServerRemote_ToolSource...rngAlloc AS tmpAlloc;
The method of having a QUERY reading directly from Excel is convenient because it eliminates an extra step of uploading the data. Update to project source data is made within the Excel Table by the data owner, and when QUERYs are refreshed the updated data is used immediately.
This is convenient for use on a desktop system, or a system used by only a few (for example, the PM who probably owns much of the data, at least for entry; a Development Ops person responsible for formal organizational budget rollup input; a Supply Chain person responsible for purchased material acquisition, tracking and distribution; a Manufacturing person responsible for processes at a Contract Manufacturer to build and test prototype equipment; a Finance manager with oversight of organizational finance actuals and outlook). The method simplifies somewhat their use of the system. The size of the database installation is also kept small, since the data itself resides in Excel and only passes through the database during a QUERY operation. That's important for SQL Server, because it allows use of SQLEXPRESS, which is free, for small databases needing only QUERY functionality and not storage. I've always been able to fit within SQLEXPRESS.
Using MS Access or PowerQuery, data input may occur even while others run QUERYs against the data. SQL Server is more complicated, since any data source file must be closed when QUERYed from a client. Using SQL Server, if more than a small handful of people may QUERY the data, or,for any of the databases used, if multiple individuals need to update data, these cannot be done simultaneously. This results in blockages, and un-availability of the database at random times and durations, and can be subject to extended downtime if errors occur during update, or if file locations change. For use by more than a tightly-controlled handful of users, the direct-access reads of source data is not a best practice.
To prevent such errors and downtime, probability of which increases substantially as the number of users increases, data can be uploaded to tables within SQL Server as demonstrated by the SQL above. This de-couples data input (which is still likely a quite limited set of people) from QUERY reads by a larger number of people. It does have the downside of storing data in the database (imagine!) but that may ultimately require use of a full installation of SQL Server which is more expensive. In operation, Data updaters update data in the DataSource file(s). They could interfere with each other if they are contending for use of the same file, although data source tables can be split to as many separate files as you like, and then creating and using a separate Linked Server LS to access each file. Each data updater must then update their data, and then execute a PUSH QUERY to upload the tables specified in the QUERY. An example is included within PowerOpI SQLServerRemote toolSource.xlsm, based on the SQL snippet above, showing how a PUSH can be done to upload all files in a single operation. This QUERYis included in ToolSource.xlsm, but could be put into ToolManagement requiring the system manager (probably the PM) to control uploading.
There are further advantages to uploading the data, beyond de-coupling user interactions. QUERYing SQL Server tables is much faster than including file-reads within each QUERY. And to go even faster, common QUERYs can be pre-executed in the PUSH operation, and the result PUSHed into its own SQL Server table which is then QUERYed to return the data source to a Pivot Table or other report in the Client. This is similar to an Oracle CUBE, or to a SQL Server VIEW. (and of course, VIEWs and CUBEs as defined by the respective database environment tools can also be used as data source for QUERYs.). The PUSH QUERY included in PowerOpI SQLServerRemote ToolSource.xlsm demonstrates this capability.
Further Distribution Configurations
Since each distribution (PowerQueryTool, MSAccessTool, SQLServerTool) will work on a single-computer configuration, you can straightforwardly connect clients to a shared computer using RDT (Remote Desktop) connections. From the RDT desktop, you can open and manipulate ToolSource.xlsm, ToolClient.xlsm and all other components of the tools. In this configuration, only the shared computer needs the SQL Server (SQL Express) and Microsoft365 tools installed. Probably only one user login at a time from a client computer can connect to the server computer though, so an etiquette or protocol among users should be established.
SQL Source Examples to use SQL Server From Remote Clients
Examples of SQL source to allow QUERYs from a client located on a computer separate from the computer hosting the SQL Server instance can be found at SQL Server from remote client
PowerOpIxxxxTool_XL.zip Components (DemoPQxl.zip; "xxxx"= "SQLServer" or "PowerQuery" or "MSAccess")
This is core functionality of PowerQueryTool. This file is set up as a Standalone configuration, and can also be used as a Data Source for ToolClient.xlsm. Walking through what's in this file:
Reports (Green tabs): These are reports driven by QUERYs that JOIN Source Data Tables in the Red tabs. qPQMProto (project overview), qPQMBuildDates (build dates for Ops), qPQMBuildSpend (simple budget for Finance, and for Ops orders), and qPQPurchReq (for tracking material purchase). Besides data contained, these illustrate use of JOINs by PowerQuery M. qPQExcelUnion illustrates UNION aggregation of several Source Data Tables using PowerQuery M. Most of the work needed in projects I worked on was handled by a handful of Tables, QUERYs and Reports just like these. (Reference: Reports)
Source Data Tables (Red tabs): The demo project is represented in several tables, each of which handles a separate aspect of the effort, simplifying representation of the project as a whole. Each illustrates data for its problem representation, and Key structure and construction used for JOINing. Some include local "subqueries" done in Excel. (Reference: Tables)
Allocation (equipment to be built and used by organizations shown with quantity, for testing identified, and configured as listed);
Tables are included for AllocationGrid, and TargetUnpivot; these currently experimental, providing function to normalize AllocationGrid (human-oriented data input) to TargetUnpivot (database-oriented structure). You could try PowerQuery functionality for normalization. Tables included in the tool download are already normalized to a usable degree.
BOM (planning-bill of materials - product build tree structure representing product elements to be built and components to be bought, and configuration of each element, assembly, and revision; includes sub-assembly quantities and costs; and KeyIn and KeyOut supporting assembly explosion);
This is not a detailed BOM to be used by a Manufacturing Facility to build program elements. This is a Program Planning BOM. It is used to plan program elements that are either hard-to-get, visibly expensive, or otherwise in need of planning and special handling.
Hard-to-get elements include any elements for which you must plan builds, or components in short supply (new silicon, on-allocation from manufacturer, end-of-life, high-competing-demand, short/rare material supply, etc.).
Expensive items could include servers, switches, memory, PCIe cards, optics, new silicon etc. The majority cost of project materials is likely driven by a surprisingly small set of elements, possibly due to broad replication. Other items may be covered by a catch-all "jellybean" category for cost estimation.
Special planning includes BOM explosion from allocated assemblies, down to elemenets for which build and integration steps must be planned. Special-handling items include those with long lead times, which might take 2-3 months between order and delivery. Other cases include elements built-to-specification such as configured servers.
The BOM is needed to roll up program material cost, as well. The Program Manager must typically create a program budget well before the program is detailed by technical design, covering the duration of the program which might be 1-3 years, well in advance of detailed design. Material can be a significant fraction of total budget.
Additionally, during execution of the program, quarterly budget review and update is usually required, needing to detail prior-quarter actuals plus next-quarter outlook. Planning is usually well in advance of Development progress: PM is planning board builds typically 6-months ahead of Dev BOM release for build.
PM is planning board-level schedule and buys as Development is designing; assemblies as the first boards are built for Development; and planning systems as the first assemblies are integrated for development. These are always estimates in advance of Development BOM release. In fact, Development will release BOMs only for product elements; items to be used for integrated testing, such as servers, switches, cables, optics, that are not included in the product to be sold, are just about never planned outside of the Program Planning BOM table describe here.
Dates (critical dates with associated keys, for all built and bought elements; represented in Normalized fashion. These are derived from the table on blue tab qMPP_RollupExcel, imported from the MS Project export file representing the project GANTT); and Builds (a table similar to Dates, but presented in non-normalized fashion);
Provision is also made for "date-aliasing" to cover the many component items to be purchased, that are not covered explicitly in the BOM (such as servers, switches, cables, optics, PCIe cards, power supplies and a much longer list). (Reference: Aliasing, Purchase Dates)
Furthermore, between the BOM Table and the Dates table, provision is made to classify spending as Capital or Expense, based on item value and expected lifetime; and for built items, "disposable" early-prototype-build elements vs. large late-production-prototype elements needed in volume that may be kept for SQA, regression test etc. for an extended period in revenue production, which may qualify for Capitalization.
Another provision is made to incorporate declining cost of prototype production over the course of the program. Inital prototypes are often built onshore in low volume with manual test; builds are later built offshore, initiating automated testing; and later incorporate material purchased on production-volume contracts. Each of these transitions lowers build cost. I estimate a 4:1 decline from initial prototypes to production builds. This may have a large effect on budget accuracy, so must be validated against prior build history.
All of these provisions are shown in the Framework demo project Tables.
Elements (a non-normalized table with base detail such as part numbers, supplier, distributor, configuration details for each product element);
CostAdjust, AdjustFactor (aid to calculation of cost progression of prototype elements as prototyping and productization flow through build Phases);
PR (tracking purchase lifecycle, marshaling and distribution status);
Group1, Group2, Group3 Tables are used in the demonstration of the UNION QUERY.
These Source Data Tables use Structured References extensively. Here's an article explaining INDEX/MATCH, SUMIF and XLOOKUP/XMATCH using Structured Tables and Structured References: usingindexmatch .
ScheduleImport (Blue tab):qMPP_RollupExcel is a Table from importing the file exported from MS Project representing the program GANTT schedule. Besides representing the schedule, tasks with critical dates present a Key that the Excel framework uses to associate those dates, via JOINs, with elements built and bought. (Reference: Schedule Import)
DataSource control (Blue tab): the DataSources tab controls QUERYs and JOINs among local and remote Tables. In the Standalone file, the data tables are all local except for the Date table which is imported from MS Project. In the Client file, only reports are included; all Source Data tables are sourced by JOINs from the DataSource file. (The DataSource file was also used as the Standalone example that includes the Reports).
The DataSources tab in these workbooks, contains several elements, ordered as follows in the Excel window:
tblConnectionConfig Controls creation and configuration of connections to Tables in local and external files and databases. In the PowerQueryTool distribution, this controls configuration of connections used by PowerQuery M QUERYs.
Buttons User control of creation and update of Connections. Excel Connection objects contain the QUERY named in tblConnectionConfig, pulled from tblSQL (for SQL) or tblConnection (for M) where they are defined. Whenever a connection is created in tblConnectionConfig, or its QUERY is updated, or its configuration is changed (eg file location), the QUERY is updated using the Build+UpdateDATE Links and Build+Update DATA Links buttons. The QUERYs, and the Pivots they drive, are updated by the corresponding Refresh DATES and Refresh DATA buttons.
tblSQL Contains SQL-language QUERYs for SQL Server, MS Access, or for embedding in M for use with these or other databases. PowerQueryTool focuses on M with PowerQuery, thus requiring no database setup; so this table is unlikely to be used in PowerQueryTool.
tblConnection Contains M Function Language QUERY definitions, containing JOIN and UNION/COMBINE QUERYs used with PowerQuery. (Some references at mstrings and connectionPQeditor). Examples used in the included demo project can be seen, and here's a page containing more examples: MTemplatesMStrings. These QUERYs can be localized using named variables in tblLocalizationConfig. This Table also contains Connection Strings used in connections to databases.
Configuration Variables Tab Variables contains a Table of Localization Variables that may optionally be used in constructing QUERYs in SQL or M, or constructing database Connection Strings.
tblLocalizationConfig Contains localization variables for use in QUERYs. (Reference at sqlConfigEditor). Named variables are configured in this table, to reflect directory structure; and table, database, and QUERY naming; to provide "programmatic" leverage in creating, and particularly for updating and distributing, tool copies and Clients for projects using the PowerOpI Framework.
Rather than embedding directory and path into QUERYs using OPENROWSET, or setting up Linked Servers or other address embeds, use Common Configuration Variables from tblLocalizationConfig. Some of them are knowledgeable of the location of the Framework workbook, and provide fully-qualified addresses relative to that. A hierarchical relationship is set up in the Table among location of the Workbook, Source Data Files it uses, and locations of shared servers.
tblLocalizationConfig Common Configuration Variables are used with PowerQuery M primarily in setup of Connection Strings to data sources. For SQL with MS Access, SQL Server and PowerQuery, they are more extensively used, in Connection Strings and also to set up Linked Servers and OPENROWSET QUERYs.
Then among these Files, as used in setting up Linked Servers and OPENROWSET QUERYs, setting a value in the hierarchy propagates to other files/servers/Linked Server variables etc. in the hierarchy to minimize work required if entities are moved to new servers, or servers are re-structured, or Client workbooks are distributred to remote users requiring path updates. Rather than detailed updates required on every Client, some updates may become un-necessary due to self-localization of some of the variables, and other updates may be simplified to update of the value of a handful of variables. This also helps maintain integrity of naming and addressing among related QUERYs.
Note that use of Stored Procedures with SQL Server, and Stored QUERYs in MS Access further centralize maintenance needed, implementing QUERY source code with embedded addresses, into the centralized server rather than in distributed Clients. They further make it less necessary to distribute path structures that disclose structure of Source Data Table file systems, and structure of the QUERYs themselves.
This file is just like ToolSource.xlsm, but with all Source Data Tables in external ToolSource.xlsm file(s), with QUERYs configured to access them. In both ToolSource.xlsm and ToolClient.xlsm, Excel tab DataSources > tblConnectionConfig > field SkipBuildUpdate is used to choose profiles for DataSource+Control (for ToolSource.xlsm) or Client (for ToolClient.xlsm) which enable QUERYs sourced from local Tables or Tables in an external file. Profiles are defined in tblConnectionConfig > fields Build/Update Profiles at far right, and can be updated there.
This is a normal MS Project plan, with added VBA to provide Export capability to an xls file named after it (see associated ReadMe, and comment below under Update and duplication), and an associated external Resource file. The provided Project file shows inserted Sub-Projects (optional), and the safest linking methodology.
This is a normal MS Visio image, with added VBA to size and position graphical objects to a Timeline object on the Image (see associated ReadMe, and comment below under Update and duplication).
Implementing Your Project
Next Steps
All a mouthful, I know. Install the tool files, configure them, poke around. Change some data, refresh via button and see how Reports update to show your change. Add an element to the project. Add a Table, add it to a JOIN or create a new JOIN, and drive a Pivot Report with that JOIN. Then try a small project, cloning from the objects in the distributed files. Check out schedule updates rippling through to Reports, and Visio Images updating to reflect schedule changes. Increase project size and complexity as you become familiar with the methodology.
Once the tool is set up and your project and product structure are represented in Source Data Tables and JOINed, concentration shifts to managing the project using and updating Table data; and the tool fades into the background, data updates frequently and structure updates occasionally.
Setting up a second project is much more straightforward: your first project is the working path using PowerQueryTool in your file structure, organization structure, and product structure, that you can modify and extend; and also provides a record of Actuals available for estimates. As you develop this infrastructure, and especially as you distribute the expertise, each project gets better than the last.
It's much more complicated to read and write about these actions, than it is to do them. Remember the PowerOpI website and support links above.
Updates and Duplication
Excel Files Both ToolSource.xlsm and ToolClient.xlsm can be re-named, but any QUERYs in Excel that reference them must be updated to reference them correctly (probably using the Common Configuration Variables).
Add an element to the project Sequence: To schedule the element explicitly, add the element to the MS Project schedule for all build revs, and populate its TaskMilestone Key fields; otherwise you can alias it to another element shortly, in the Dates Table. Add the element and its data to the Elements Table. Add each build rev of the element to the Dates Table (and Builds Table if you're using it), aliasing it using the Use fields if needed. Add each build rev of the element to Table BOM. Then allocate revs of the element for use as needed, in the Allocation Table. Click the Refresh DATA button and check that the element shows properly in Reports.
Data Source Tables You can update data within the Tables, taking care that Keys calculated from data fields will JOIN with other Tables. You can add add and re-order rows, and add and re-order data fields. If you re-name a field, the new name will ripple through associated QUERYs, and you must re-add the newly-named field into Pivot Tables that use it. You can add and delete columns (fields) in the table, again taking care with Key field value correctness. You can duplicate a workbook tab, which will duplicate the Table and its VBA code page, and then hack its contained Table.
To incorporate a new Table in a JOIN to make it useful driving a Pivot Table. Look at the M QUERYs: specify data source, extract Tables, JOIN, and output the JOIN including any calculated fields needed.
Reports These are normal Pivot Tables, Pivot Charts, and Tables, and can be updated using normal methods (Pivot Table Analyze menu items, field ordering, dropdowns, sorting, right click formatting etc.). As you make changes to Tables, refreshing a Pivot or using the Excel Tab DataSources > buttons Refresh DATES or Refresh DATA will update data in the Pivots, and show fields net of add/deletes to Pivot Table Fields dialogues for each Table. You can use menu Excel > PivotTable Analyze > Data > Change Data Source > Change Data Source… to drive the Table from a different QUERY/Connection.
QUERYs and Connections These can be added/updated/deleted using native Excel/PowerQuery tools, or using the facilities of the PowerQueryTool. PowerQuery tools include at Excel Menu Data > Get Data > Launch Power Query Editor… > and creating a new, or selecting an existing, QUERY, or using the Advanced Editor etc. Attach a Pivot Table to a QUERY by using right-click choices in an item in Excel Menu Data > Queries & Connections. In PowerQueryTool, you can create or re-configure connections in tblConnectionConfig on Excel tab DataSources; edit or create an M QUERY in tblConnection (ensure that the intended QUERY is selected in tblConnectionConfig field Provider) and driving a Pivot Table from it. If a QUERY in PowerQueryTool uses its Common Configuration Variables from tblLocalizationConfig, their values can be adjusted in that Table.
On any add/update/delete to QUERYs in Excel, you must re-build QUERYs using Excel Tab DataSources > Button Build+UpdateDATE Links (first) and then Build+Update DATA Links (second). See the associated ReadMe for the Excel files.
MS Project Plan / Schedule You can add/update/delete an MS Project plan using customary tools in Project. You must retain the added field TaskMilestone, and populate it using structure matching your Keys in Excel Tables to which it will be JOINed.
To create a new project, clone the original MS Project file distributed, to inherit its VBA. The string rollup in the filename enables the file to export file P0001_Rollup.xlsx for import by the Framework Excel files by QUERYs. A Macro is provided and available within MS Project for this. The Project files can be re-named as usual, but you must re-link QUERYs in Excel to access them by the updated name.
MS Visio Image Instructions are given in the download zip ReadMe. Date updates occur on Open, Save, or Visio External Data Refresh. New items can be added to an image by creating supported graphic objects (see the ReadMe), and dragging a task to it from the External Data pane. To create a new image, copy an existing image to inherit its VBA, and modify the clone. Visio sizes and places objects relative to a Timeline object; you must group graphic objects vertically as makes sense to group tasks.